|
|
|
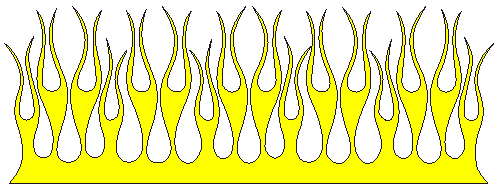
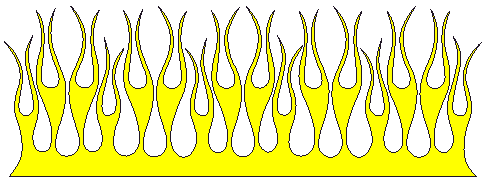
Vinyl Colors:
|
Instructions (Dry) (Quick & Easy, Only Recommended For Small Graphics) Tools: 1) Scissors or razor knife 2) Masking tape 3) Squeegee (hard plastic about 3.5” to 4” wide) (An old floppy works ok) 4) Glass cleaner and paper towels 5) A friend (for an extra set of hands) (Complete Installation Kits Available)
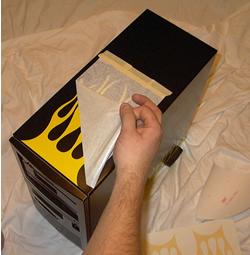
1) Please read all instructions before starting. If for any reason you do not feel that you can complete the installation, seek a professional installer. 2) Lay all graphics flat on a smooth surface for at least 30 minutes at room temperature before starting. 3) If you are applying to a computer case , shut down and unplug the power . 4) Clean surface of case very well with glass cleaner to remove any dust, wax or grease. (test cleaner on inconspicuous spot first to make sure cleaner doesn’t harm surface, be careful not to get any cleaner on computer components or graphics) 5) Make sure surface is completely dry, and then hold graphic up to surface and trim to fit the way you like. 6) Position graphic, and then use masking tape in a straight line along one edge to hold it in place. 7) Flip up graphic and remove backing slowly. (make sure all of the graphic stays on the pre mask) (do not let the graphic touch anything) 8) This is where an extra set of hands helps alot. Very carefully pull graphic tight from the corners that are not taped, and position it about 1/2'” above surface (DO NOT LET IT TOUCH) while keeping it tight, start slowly in the center of the taped side working your way out, smooth out the graphic with squeegee. 9) Now that it’s all flat, run the squeegee very firmly back and forth over the graphic several times making sure it’s stuck down good. 10) Carefully remove the pre mask, pulling it away from the sharp tips of the graphic. (if the tips start to lift, press and rub them down again until they stay.) 11) If you have any places where the graphic goes crossed a gap, (such as a fender and a door or hood) this is the time to cut it. Carefully cut down the center of the gap and then slowly in the center, working your way out, press the extra around edge of surface into the gap. 12) THAT’S IT. Move on to the next one. (if you end up with a few little bubbles you can pop them with a needle and press the air out)
Instructions (Wet) (Slower & Easier, Recommended For Larger Graphics) Tools: 1) Scissors or razor knife 2) Masking tape 3) Squeegee (hard plastic about 3.5” to 4” wide) (An old floppy works ok) 4) Glass cleaner and paper towels 5) A friend (for an extra set of hands) 6) Small squirt bottle filled with installation fluid. (A few drops of dish soap, then fill the rest up with water can be substituted if need be, but real installation fluid does work much better and dries alot quicker too.) (Complete Installation Kits Available)
1) Please read all instructions before starting. If for any reason you do not feel that you can complete the installation, seek a professional installer. 2) Lay all graphics flat on a smooth surface for at least 30 minutes at room temperature before starting. 3) If you are applying to a computer case , shut down and unplug the power . 4) Clean surface to be applied to very well with glass cleaner to remove any dust, wax or grease. (test cleaner on inconspicuous spot first to make sure cleaner doesn’t harm surface, be careful not to get any cleaner on any electrical components or graphics) 5) Make sure surface is completely dry, and then hold graphic up to surface and trim to fit the way you like. 6) Position graphic, and then use masking tape in a straight line along one edge to hold it in place. (If graphic is too big or oddly shaped and you can't tape it along one edge, put some masking tape on surface just outside of graphic to use as alignment points.) 7) Flip up graphic and remove backing slowly. (make sure all of the graphic stays on the pre mask) (do not let the graphic touch anything) 8) Lightly spray surface with installation fluid (this will keep graphic from sticking right away) (be careful not to get any fluid on any electrical components) 9) This is where an extra set of hands helps alot. Very carefully pull graphic tight from the corners that are not taped, and position it on the surface, start slowly in the center of the taped side working your way out, smooth out the graphic with squeegee. (If graphic is too big or oddly shaped and you where not able to tape it along one edge. Spray graphic also with installation fluid, then stick on surface and slide into place where you placed your alignment marks earlier.) 10) Now that it’s all flat, run the squeegee very firmly back and forth over the graphic several times, pressing water out from under graphic, make sure it’s stuck down good. 11) Now just let it dry (Dry time will vary depending on temperature) 12) Carefully remove the pre mask, pulling it away from the sharp tips of the graphic. (if the tips start to lift, press and rub them down again and wait a little longer for them to dry, try again until they stay) 13) If you have any places where the graphic goes crossed a gap, (such as a fender and a door or hood) this is the time to cut it. Carefully cut down the center of the gap and then slowly in the center, working your way out, press the extra around edge of surface into the gap. 14) THAT’S IT. Move on to the next one. (if you end up with a few little bubbles you can pop them with a needle and press the air out)
Installing Multi
Layers
1) Please read all instructions before starting. If for any reason you do not feel that you can complete the installation, seek a professional installer. 2) Lay out all layers so you know how they all line up. Check to make sure the base color goes down first (usually black, but check to make sure that all layers will be seen and that they all line up correctly.) 3) There are two ways of aligning the layers. #1 boarder method, this method involves using a boarder all the way around the graphic to line up multi layers and then removed at the end to just show graphic itself. #2 registration targets, this method involves lining up small targets on each layer and then removing them all at the end. 4) Start by installing the base layer as described in the standard installation section, wet or dry, it is up to your comfort level. 5) Line up the next layer. (Make sure that if you are using the wet method that the first layer and surface is completely dry before you start lining up the next layer.) If your surface is transparent, you can put a light of some sort behind it and it will make lining up each layer much easier. If your surface is not transparent then just lift up the corners a little bit until they all line up. 6) Now that the next layer is lined up, tape it along one edge like before. If you your graphic came with the boarder style alignment, then if you wish you can decide if you want to keep one of the boarders around the graphic. If so, decide which color you want. After you get each layer lined up and taped in place so it can't move, just before you get ready to stick it down, remove the boarder you don't want. (remember if you remove the layer that is already stuck to the surface, make sure you leave the next one on until you get the following layer lined up, or else you may not have anything to help you line up the following layer.) 7) Now stick it down just like before. Then move on to the next layer and so on until they are all done. (if you end up with a few little bubbles you can pop them with a needle and press the air out) Have fun.
|
Complete Installation Kit Kit contains:
This kit makes installing all types of graphics much easier. We have tried all types of installation fluids out there, and find that this is the best product for installing vinyl graphics. This is our own recipe, it seems to allow graphics to slide around better and then dry faster than others out there. And it smells good too. This works much better than the old soap and water trick. There is enough fluid to install many graphics in this bottle, it doesn't take much to do the job.
|
|
|
|
|
Most orders are shipped within 48 hours of receiving payment. |
The Coolest Web Hosting on the planet!!!!
.
Copyright © 2005-2014 GraveyardGraphics.com, All rights reserved
Note: The product and company logos on this site are the registered trademarks of their respective companies, and are provided as a convenience only for their lawful use. Any unauthorized use of the aforementioned items by the purchaser shall be the sole responsibility of the purchaser. Any product purchased from GraveyardGraphics.com is not an authorization for the use of any logo or trademark. By purchasing an item from GraveyardGraphics.com you convey that you have the authority (if need be) to legally use the above artwork. All entries become property of GraveyardGraphics.com. By sending us any pics or small videos and entering the contest, you give us the right to use them in any way we like (including but not limited to, advertising, promotion, etc...).
.JPG)